

Gmail is a free webmail service that is used by many companies and individuals. If you are reading this article, you may also be considering introducing Gmail.
In this article, we will introduce how to create a Gmail
account
and how to log in. We’ll also explain how to add another email address in Gmail, as well as some useful tricks to increase efficiency, so please use this as a reference.
What is Gmail?
First, let’s start with an overview of Gmail. Gmail is a free webmail service provided by Google that can be used by individuals, companies, and organizations of any size. Also, there is no restriction that an individual can only create one account, and it is possible to create multiple accounts.
Gmail can be used anywhere you have an internet connection. Also, it does not matter whether it is a mobile device such as a smartphone, or a device such as a PC. It is a very convenient web mail service, so if you are wondering which mail service to use, you should try Gmail first.
How to create a Gmail account
So far, we have provided an overview of Gmail. From here, I will show you how to create a Gmail account. To be able to use Gmail, you need to create a Google account.
There are 5 steps.
- Access the Gmail opening page
- Enter your name, username, etc.
- Enter phone number, gender, etc.
- Confirm and agree to the privacy policy
- Use Gmail
Let’s look at each in turn.
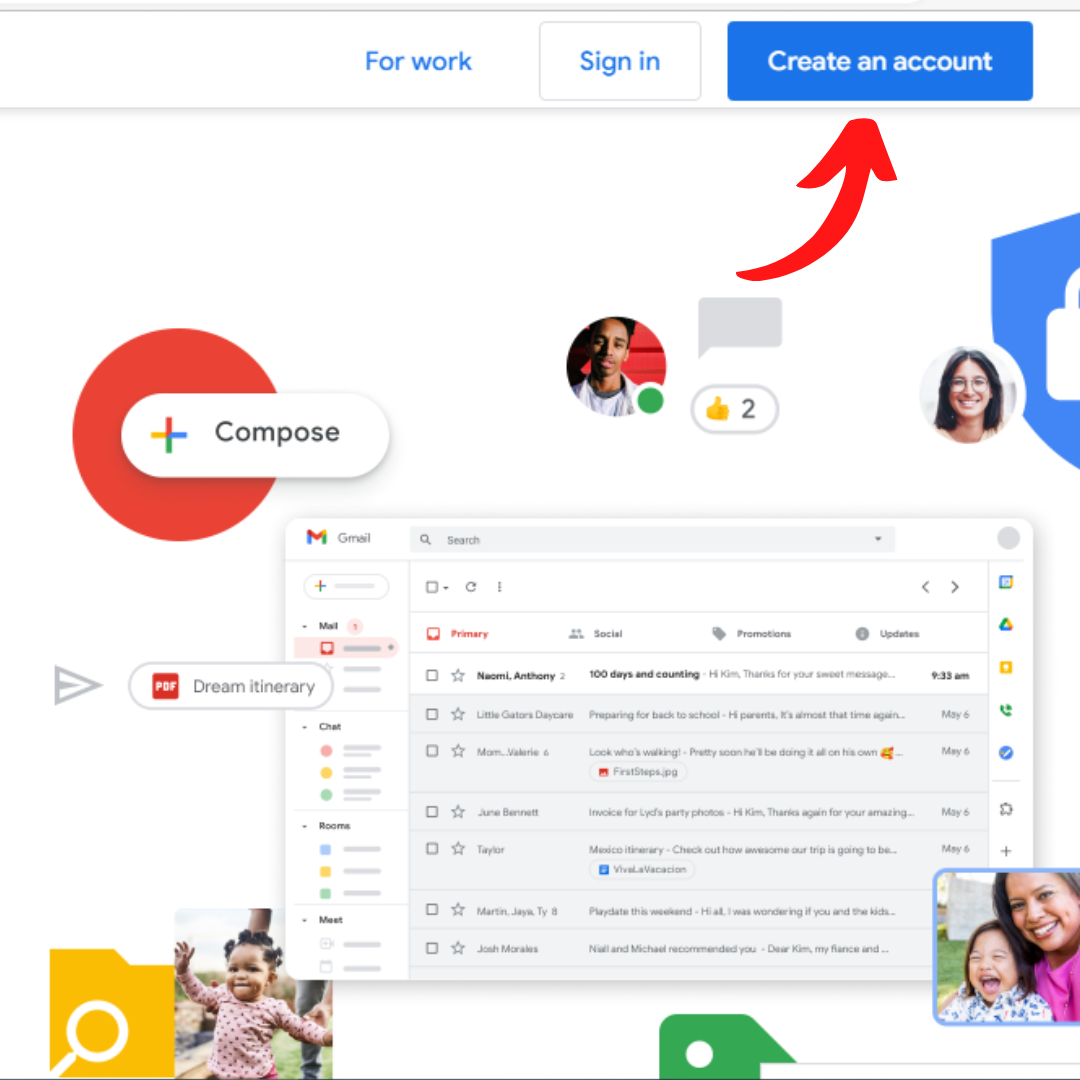
Access the Gmail opening page
First, access
the Gmail setup page
. When you access the opening page, there is a button in the top right corner of the screen that says “Create an account”, so click it.
.jpg)
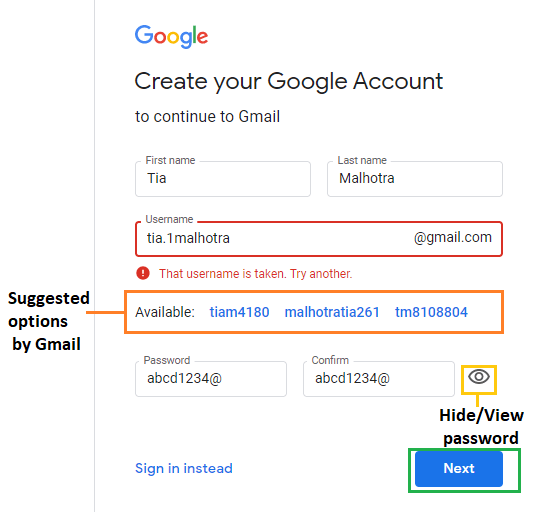
Enter your name, username, etc.
When you click the Create Account button, you will be redirected to the next screen where you can enter your user information. Here, enter the following information.
- name
- username
- password
As for the name, there is no problem as long as you enter the name used by individuals, organizations, etc. Next, your username will be set as the email address displayed in Gmail. For example, if your username is “example”, your Gmail address will be “example@gmaill.com”.
Once you set a Gmail address, you cannot change it later, so please keep this in mind when setting up your Gmail address. Finally, decide on your password as well. Password must be 8 or more characters, including half-width letters, numbers, and symbols. Please note that you can change the password after setting it, so there is no problem even if you forget it.

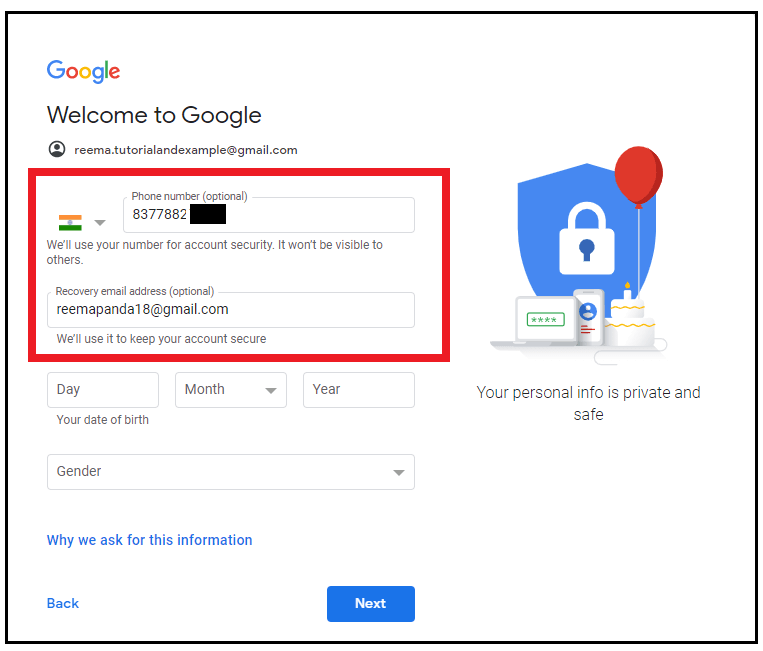
Enter phone number, gender, etc.
Once you have decided on a username and password, enter the following information:
- telephone number
- Email address for reset
- date of birth
- sex
As for your phone number, you can use either your personal mobile number or a personal number assigned by your company. You can use either a personal or company email address to reset your email address.
All you have to do is enter your date of birth as personal information. As for the final gender, you can choose from female, male, unspecified, or custom, so choose the one that suits you.

Confirm and agree to the privacy policy
When you enter your phone number, gender, etc., you will be redirected to a page where you can confirm the privacy policy and terms of use. If there are no problems with the information you have confirmed, press the “Agree” button to complete the process. From now on, you will be able to use Gmail.

Use Gmail
After creating a Gmail account, you can use Gmail at any time by clicking the login button from the Gmail account creation page and entering your login information.
Additionally, if you use Google Chrome as your browser, you can also use it by selecting Gmail from the Google Chrome search screen. Use Gmail in a convenient way depending on the browser you usually use.
How to add another email account to your Gmail account
So far, we have explained how to create a Gmail account. On top of that, some people may want to manage multiple email addresses with one Google account. From here, we will show you how to add another email account (address) to your Gmail account.
Click on settings (gear)
First, click the gear icon in the top right corner of Gmail. Click on the gear icon and you’ll see a “Show all settings” button, so click it.
Add email account
Click on the settings button and open the tab called “Account”. Select “Check email from other accounts” and click “Add email account.”
Enter email address
Here, enter the email address you want to add. Note that you can also add other than Gmail.
Entering information
Next, enter information such as username and password. Here, be sure to check “Use a secure connection (SSL) to retrieve email”.
setting
When you click the “Add Account” button, the message “Email account has been added” will be displayed. At this time, if you check “Yes, I will be able to send emails as xx@xxx”, you will also be able to send emails, which is very convenient. Note that you can change this setting at any time.
Enter mail server information
In order to be able to send using the added email address, enter the email
server
information. Also, be sure to check “Secure connection using SSL” here as well.
Verify authentication information
Once you have completed the steps above, you will receive an email confirmation of your credentials in your Gmail account. Complete the setup by entering the “confirmation code” included in the confirmation email or clicking the link in the email. From now on, when you send an email using Gmail, you will be able to select the added email address in the email address input field on the email creation screen.
:max_bytes(150000):strip_icc()/Capture-008cfd53131747318b374c477c9295a4.JPG)
How to log in to Gmail
So far, we have explained how to add an email address to Gmail. From here, we will introduce how to log in to Gmail in case you don’t know how to log in. Please note that the steps are very simple.
Access Gmail
First, access
the Gmail login screen
. If you press the login button from the TOP page, you will be redirected to the login screen.
Enter your email address and password
Here, you can log in simply by entering the email address and password you set in advance. Please note that if you forget your password, you can reset it.
3 efficient tricks you can use with Gmail
Lastly, I’d like to share three tricks to help you use Gmail more efficiently in the future.
- shortcut keys
- archive
- search command
Let’s look at each in turn.
shortcut keys
After opening Gmail, open the General tab of the settings screen and turn on keyboard shortcuts. This will allow you to use shortcut keys in Gmail. For example, you can type “g+i” to go to your inbox. There are also other shortcut keys, such as “g + t” to move to sent mail and “g + s” to move to starred mail, so please try various ones.
archive
Some of you reading this article may want to delete unnecessary emails, but are still unsure whether to delete them or not. In such cases, it is convenient and recommended to use
the archive
function. Archiving doesn’t delete your emails, but it doesn’t show up in your regular inbox, which saves you some time when checking your emails.
Select the email you want to archive, right-click and select Archive. Next, type “-in:inbox” in the search box to display only archived emails.
search command
Finally, Gmail also provides a useful search command. For example, a search command of “is:unread” will display only unread emails, and a search command of “before: 2022/01/01” will display only emails before the specified date.
There are various search commands, so try using them in combination with shortcut keys.
summary
In this article, we explained how to open a Gmail account. Gmail is a free webmail service provided by Google that can be used by any organization, including companies and individuals, regardless of the number of people in the organization.
It is possible to create an account with simple steps, so why not start by creating an account using this article as a reference?